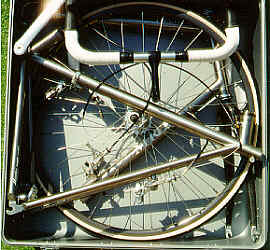
Photo 1
Be sure to look at the 3D images that show this packing sequence from all angles.
This sequence illustrates how a large road bike (large size and large diameter tubes), equipped with ergo style shifters, can be easily packed in our 26 X 26 X 10" hard case (smaller bikes should require less disassembly). The derailer cables were disconnected using Bruce Gordon cable splitters and the chainring (self extracting) and front brake caliper were removed to facilitate packing. Each bike may pack differently and the method shown here may need to be modified for other bicycles. This bicycle is shown with protective tube covers and compression members removed for easier identification of the frame pieces in this packing sequence. Be sure to adequately protect tubes and components when shipping a bicycle. The chainring was removed due to the large size of the frame. Most bikes do not require removal of the chainring although it makes packing much easier in most situations.
How long should it take to pack a bike?
I disassembled and packed this bike in less than 15 minutes on my second try (still learning) which included putting the tube covers on the frame tubes. This is about the most disassembly I have ever had to do on any bike and that's only because the frame is so large. Assembly takes less time than disassembly since the tube covers come off much faster than they go on and taking the pieces out of the case is much faster than fitting them in. I keep a photocopy of these photos with the bike case so I don't forget the steps required to achieve a proven fit. I estimate that with practice, it could be done in about 10 minutes.
Every bike is slightly different so on your first attempt, you should allow at least an hour or more, once you have your tube covers cut and labeled, to experiment with packing methods. Pack it for the first time when you aren't in a hurry to catch a flight! I had a bike that after an hour of trying, I just couldn't pack to my satisfaction. The next morning I tried again and in less than 5 mintutes, it was in the case and perfectly packed.
Once you have a proven packing method, it should take 10-30 minutes depending on the complexity of your packing method and your packing ability. I haven't had a 62 cm or smaller road bike that I couldn't pack in the standard 10" case however I have had customers who prefer the 12" case. Both the 12" and 14" cases exceed the legal luggage size limit by 2 and 4 inches so if you use either of them, you could get charged for oversize luggage.
General packing tips to make the job faster and easier:
The packing sequence:Remove parts as required to make packing easier. For example, Attempting to leave a rack attached to your frame will make packing the bike into a standard 10" case unlikely.
Packing a rack. If you have a rack, the best method is to remove the rack. Once everything except the front wheel is packed, lift the packed frame, wheel and handlebars as an assembly out of the case slightly and fit the rack over or through the raised pieces. Then lower them back into the case (much like fitting a paper clip over a stack or paper). You may need to try from more than one direction before you find a place that works but it should be possible to do.
Use tube covers instead of water pipe insulation. Water pipe insulation works great if you have plenty of extra space, however, that usually isn't the case. I have had many customers use it successfully, especially in backpack cases, however it is more often the source of packing problems when using a hard case. The thickness of the insulation ends up taking up so much room that it may be difficult to fit everything in and still close the lid.
Label the tube covers with a light colored paint pen marker. Figuring out which cover goes where can be one of the most time consuming things to do if they aren't labeled clearly.
Use gear cable splitters. Positioning the frame pieces in exactly the right position for optimal packing can be difficult if not impossible when the frame sections are connected together with a cable. Having splitters also eliminated the problem of getting cables crossed or tangled during the packing process.
Take photos of you packing sequence once you have a proven packing method. Once you have the bike packed the way you like it, take a photo. Then take out one item and take another photo, take a second item out and take another photo. Repeat that process until everything is out of the case. Once the photos are developed, staple a set together in reverse order and you will have a perfect record of how to pack the bike. Taking photos as you pack doesn't work nearly as well since things get moved as you pack the bike so it doesn't produce an accurate record of the end result.
Step 1:
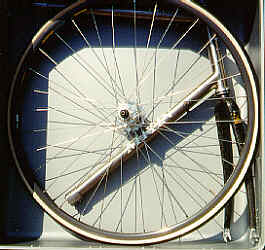
Position the front frame triangle in the bottom of the case as shown with the fork in either the normal riding position or turned 180 degrees. Turning the fork only 90 degrees will probably put the downtube in the center of the case which will make packing difficult.
Since this is a large frame, I turned the fork backwards to keep the downtube farther away from the center of the case which makes more room for the freewheel.
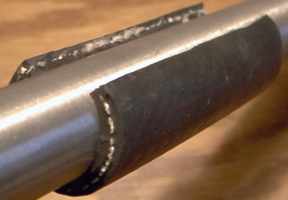
To prevent the freewheel from damaging the downtube, I put a 6" long piece of rubber hose that is slit along one side around the tube in addition to the tube covers. (shown without hose and tube covers)
Step 2
Place the rear wheel (skewer removed) in the case, freewheel down.
Placing a rag or tube cover over the end of the hub where it contacts the case is a good idea since the sharp end of the axle may damage the case.
The wheel should sit in the case tilted at an angle. The tire should touch the bottom of the case (on the the left side in photo #1).
Having the wheel tilted at an angle is good since it creates a low area for the wide part of the rear triangle.
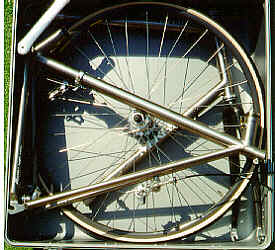
Step 3
Place the rear triangle in the case as shown.
Be sure that the widest part of the frame (the rear dropouts) is over the wheel where it contacts the bottom of the case. You should position the frame so the seat tube doesn't contact the rear hub. Protect the seat tube with a short piece of rubber hose and tube covers.
The chainring/crank was removed since this is a large frame. I like to remove it even on small frames even when it's not necessary since it makes packing much easier. I use a Sugino Autex Self-Extracting Crank Bolt to make removal quick and easy. It only takes a few seconds to do.
Step 4.....This is one of the important keys to a successful packing job!
Put the handlebars in the case over and through the rear wheel.
Putting the handlebars in the case can be tricky but it's very important to do it right. I put my right handlebar drop over the outside of the wheel while the left drop goes through the largest opening between the spokes. It is important to reposition the wheel by rotating it if the largest opening in the spokes isn't in the right place to allow the bars to be positioned as shown.
- First rotate the handlebars slightly then insert the left drop through the spokes
- Then tilt the bars a little to fit the stem through another opening in the spokes
- Then the right drop is hooked over the wheel.
It is usually necessary to lift the wheel slightly while putting in the handlebars. It may also be necessary to turn the handlebars to get them to go though the opening between the spokes. This is something you will need to work out for yourself since the wheel lacing pattern, number of spokes, handle bar width, stem length and other factors may require that you modify this procedure slightly. When the handlebars are positioned properly, there shouldn't be any pressure against the spokes and the handlebars should be able to move slightly with no binding. It may take some experimenting to figure out how to do this step but it is time well spent.
Step 5
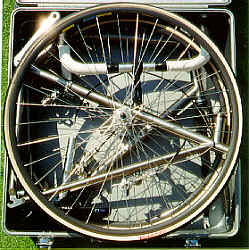
Put the front wheel (skewer removed) on top of the handlebars and rear triangle.
Step 6
Go back and lift the wheel then place other items such as saddle, shoes, clothing in sacks, tools and crank into the case one at a time. Check to make sure that they don't interfere with the front wheel as you pack each item the case. It's easy to get carried away by putting several things in at a time which may cause the wheel to stick up.
Be careful when putting extra items like tools in the case with the bike. The maximum weight per case is up to each individual airline. The recent 70 pound maximum has been reduced to 50 pounds by many airlines. It's a good idea to either limit you case to a total of 50 pounds or check with your carrier to verify their maximum.
Step 7
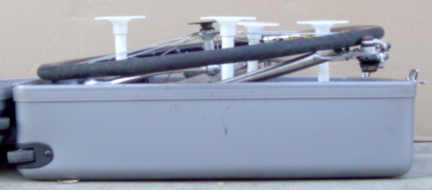
Install the compression members.
- First look for the most open areas that are near the center of the case that will allow the piece of PVC pipe to pass through without damaging anything (avoid pressure against spokes).
- Once you have identified where you will place the pipes, position the discs at the bottom of the case where they need to be to accept the pipe.
- Next, insert the pipe through the open area and into the socket on the disc.
- Put the second disc on the upper end of the plastic pipe.
- Verify that the compression members stick up higher than the bike parts, especially the front hub.
- Place a rag or tube cover over the sharp end of the axle so it won't cut through the case.
- Closing the case lid. It may be necessary to push the tire into the lid past the metal frame as you close the lid. This can be a little bit tricky at first but it's really easy to do once you get the hang of it. To close the lid, first lower the lid until it touches the tire on the front wheel. When the lid touches the tire, it will be about 2 or 3 inches from closing. Then, push down gently on the top of the case with your knee or the palms of your hands while your fingers reach down the sides and push the tire into the lid of the case. Once the tire is in on both sides, push down with one hand on the front edge of the case while using the other hand to push the tire into the lid then close the lid completely. I recommend that most of the air be let out of the tires. Keep just enough air so the tire retains it's shape but can easily be squeezed flat with your fingers.
- When bike is properly packed, the lid will stay down with little or no force.
- When you latch the case shut, hold the lid down as you actuate the latch. Don't try to pull the case shut with the latch or you may break it. The latches have their full strength only when they are completely closed. They are not designed to pull the case shut.
- It is possible to get a little extra depth in the center of the case by using longer pieces of PVC pipe to create taller compression members. You can get 1/2 " PVC pipe at any hardware store. Before you resort to this technique, make sure you aren't missing any of the steps listed above and try some variations to see if another method works better for you. Be sure to hold the case shut before you actuate the latches as mentioned above.
When you bike is properly packed, the contents including the front hub should be lower than the top of the compression members. When the case is closed, the top of the case should bulge slightly from contact with the compression members but not from the bike itself.
Backpack case notes: We don't recommend using compression members with a backpack case. The 26"x26" faces of a backpack aren't fixed so the compression members could turn sideways and damage your bike. When packing a backpack case, be sure to fill both pockets on each face of the case with soft items like clothes to help protect the bike. The pockets not only bulge out, they bulge in and distribute the load over a wide area. Placing a flat 26" square board or other stiff item inside a backpack case, which some people want to do, will only concentrate the force on the hub and possibly cause damage. Also, it's important to stuff the 4 corners of the case between the wheels and the four corners with soft items such as clothing to help protect your frame. Stuff sacks/bags or plastic bags filled with clothes works great.